LASER SENSOR REMOVAL/INSTALLATION


id041500802600

Warning
•  A removed laser sensor will not meet the conditions for a class 1M laser under the IEC 60825-1 specification and therefore eye safety cannot be assured.
•  To prevent eye injury, do not peer directly into the laser sensor using optical instruments with a magnification function such as magnifying glasses or microscopic and objective lenses within a distance of 100 mm {3.94 in} from the sensor.
Caution
•  If the laser sensor is installed at an incorrect angle, the laser sensor cannot detect obstructions correctly which could result in an accident. When installing the laser sensor, verify that there is no damage or deformation to the installation part (bracket) and perform the installation correctly.
•  If the laser sensor (windshield) gets hit, the laser sensor angle could change and the obstructions cannot be detected correctly which could result in an accident. If the laser sensor has been hit, always inspect for DTCs and verify that there is no malfunction in the Smart City Brake Support (SCBS) system.
•  Do not disassemble the laser sensor because it cannot be disassembled together with the lens. If it has been disassembled, replace the laser sensor.
•  The internal parts of the laser sensor could be damaged if dropped. Be careful not to drop the laser sensor. Replace the laser sensor if it is subjected to an impact.
Note
•  When the ignition is switched ON, the laser sensor reads the vehicle specification information sent via CAN transmission from the instrument cluster, and stores the vehicle specification information.
•  The laser sensor prior to replacement stores the vehicle specification information.
•  A new laser sensor does not store any vehicle specification information.

1.  Remove the sensor cover A. (See SENSOR COVER REMOVAL/INSTALLATION.)

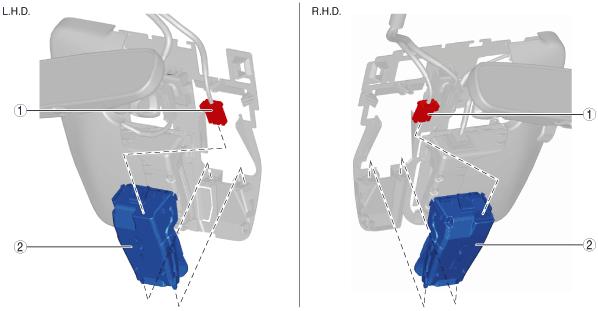
2.  Remove in the order indicated in the table.

3.  Install in the reverse order of removal.

4.  If the laser sensor is replaced, perform the auto configuration using the following procedure.

(1)  Switch the ignition ON (engine off or on) and wait for 10 s or more.
(2)  Switch the ignition off and wait for 3 s or more.
(3)  Switch the ignition ON (engine off or on) and complete the laser sensor auto configuration.
(4)  Clear the DTC. (See CLEARING DTC [LASER SENSOR].)
(5)  Switch the ignition off and wait for 3 s or more.
(6)  Switch the ignition ON (engine off or on) and wait for 10 s or more.
(7)  Using the M-MDS, verify that DTCs U2300:54/U2300:55/U2300:56/U2300:64 are not displayed.
•  If DTCs U2300:54/U2300:55/U2300:56/U2300:64 are displayed, go to the DTC troubleshooting procedure. (See DTC U2300:54/U2300:55/U2300:56/U2300:64 [LASER SENSOR].)

am2zzw00007327

1
Connector
2
Laser sensor


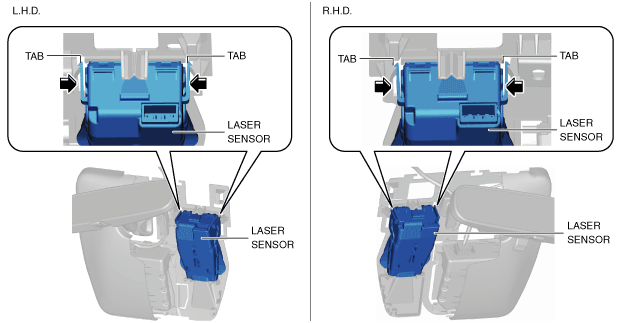
Laser Sensor Removal Note

1.  Press the laser sensor tabs and remove the laser sensor.

am2zzw00007328


Laser Sensor Installation Note

1.  When installing the laser sensor, listen for a click indicating the laser sensor is securely installed.

2.  Make sure that the laser sensor tabs are attached correcting.