 |
am2zzw00011921
EXHAUST SYSTEM REMOVAL/INSTALLATION [SKYACTIV-G 1.3, SKYACTIV-G 1.5]
id0115q1800200
1. Disconnect the negative battery cable. (See NEGATIVE BATTERY CABLE DISCONNECTION/CONNECTION.)
2. Remove the plug hole plate. (See PLUG HOLE PLATE REMOVAL/INSTALLATION [SKYACTIV-G 1.3, SKYACTIV-G 1.5].)
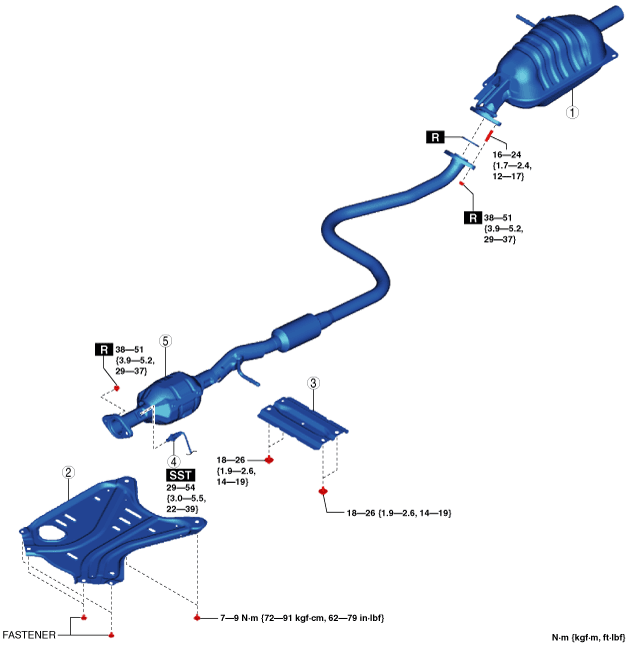
3. Remove in the order indicated in the table.
4. Remove the exhaust system insulator. (See Exhaust System Insulator Removal/Installation.)
5. Install in the reverse order of removal.
Step 1
am2zzw00011921
|
|
1
|
Main silencer
|
|
2
|
Insulator
|
|
3
|
Tunnel member
|
|
4
|
HO2S
|
|
5
|
TWC
|
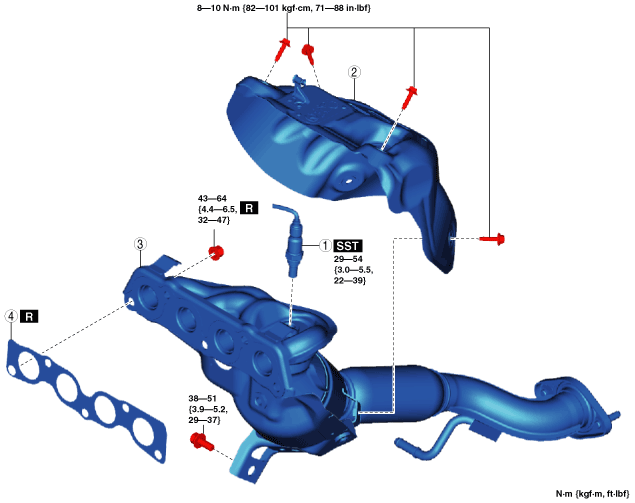
Step 2 (SKYACTIV-G 1.3, SKYACTIV-G 1.5 (with 4-1 exhaust system))
am2zzw00011922
|
|
1
|
A/F sensor
|
|
2
|
Exhaust manifold insulator
|
|
3
|
Exhaust manifold (WU-TWC)
|
|
4
|
Exhaust manifold gasket
|
Step 2 (SKYACTIV-G 1.5 (with 4-2-1 exhaust system))
am2zzw00011923
|
|
1
|
A/F sensor
|
|
2
|
Exhaust manifold insulator
|
|
3
|
Exhaust manifold (WU-TWC)
|
|
4
|
Exhaust manifold gasket
|
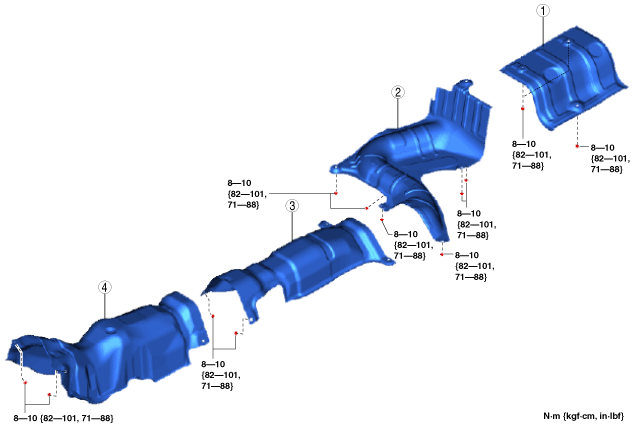
Exhaust System Insulator Removal/Installation
1. Remove the exhaust system insulator in the order shown in the figure.
2. Install in the reverse order of removal.
am2zzw00011924
|
|
1
|
Insulator (rear)
|
|
2
|
Insulator (middle No.1)
|
|
3
|
Insulator (middle No.2)
|
|
4
|
Insulator (front)
|
Exhaust Manifold Insulator Removal Note
SKYACTIV-G 1.5 (with 4-2-1 exhaust system)
1. Remove the windshield wiper arm and blade. (See WINDSHIELD WIPER ARM AND BLADE REMOVAL/INSTALLATION.)
2. Remove the cowl grille. (See COWL GRILLE REMOVAL/INSTALLATION.)
3. Remove the exhaust manifold insulator.
Exhaust Manifold Removal Note
SKYACTIV-G 1.3, SKYACTIV-G 1.5 (with 4-1 exhaust system)
1. Remove the front under cover No.2. (See FRONT UNDER COVER No.2 REMOVAL/INSTALLATION.)
2. Remove the windshield wiper arm and blade. (See WINDSHIELD WIPER ARM AND BLADE REMOVAL/INSTALLATION.)
3. Remove the cowl grille. (See COWL GRILLE REMOVAL/INSTALLATION.)
4. Remove the windshield wiper motor. (See WINDSHIELD WIPER MOTOR AND LINK REMOVAL/INSTALLATION.)
5. Remove the cowl panel. (See COWL PANEL REMOVAL/INSTALLATION.)
6. Remove the exhaust manifold.
SKYACTIV-G 1.5 (with 4-2-1 exhaust system)
1. Remove the front crossmember. (See FRONT CROSSMEMBER REMOVAL/INSTALLATION [SKYACTIV-G 1.3, SKYACTIV-G 1.5].)
2. Remove the exhaust manifold.
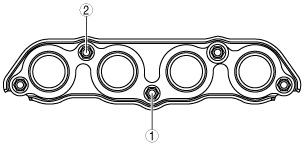
Exhaust Manifold Installation Note
SKYACTIV-G 1.3, SKYACTIV-G 1.5 (with 4-1 exhaust system)
1. Temporarily tighten the exhaust manifold installation nuts (1) and (2) shown in the figure by hand.
ac5uuw00002679
|
2. Tighten the exhaust manifold installation nuts (1) and (2) shown in the figure to 33—53 N·m {3.4—5.4 kgf·m, 25—39 ft·lbf}.
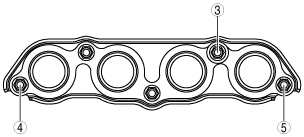
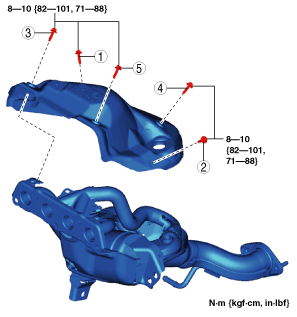
3. Temporarily tighten the exhaust manifold installation nuts (3) to (5) shown in the figure by hand.
ac5wzw00002715
|
4. Tighten the exhaust manifold installation nuts (3) to (5) shown in the figure.
5. Tighten the exhaust manifold installation nuts (1) and (2) shown in the figure.
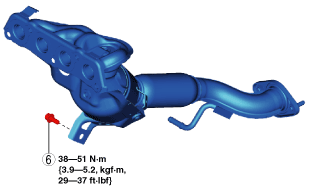
6. Temporarily tighten the bolt (6) shown in the figure.
am2zzw00012866
|
7. Tighten the bolt (6) shown in the figure.
SKYACTIV-G 1.5 (with 4-2-1 exhaust system)
1. Temporarily tighten the exhaust manifold installation nuts (1) and (2) shown in the figure by hand.
ac5uuw00002679
|
2. Tighten the exhaust manifold installation nuts (1) and (2) shown in the figure to 33—53 N·m {3.4—5.4 kgf·m, 25—39 ft·lbf}.
3. Temporarily tighten the exhaust manifold installation nuts (3) to (5) shown in the figure by hand.
ac5wzw00002715
|
4. Tighten the exhaust manifold installation nuts (3) to (5) shown in the figure.
5. Tighten the exhaust manifold installation nuts (1) and (2) shown in the figure.
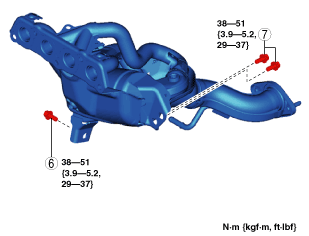
6. Temporarily tighten the bolts (6) and (7) shown in the figure.
am2zzw00011926
|
7. Tighten the bolts (6) and (7) shown in the figure.
Exhaust Manifold Insulator Installation Note
1. Temporarily tighten the exhaust manifold insulator.
2. Tighten the exhaust manifold insulator in the order shown in the figure.
SKYACTIV-G 1.3, SKYACTIV-G 1.5 (with 4-1 exhaust system)
am2zzw00012867
|
SKYACTIV-G 1.5 (with 4-2-1 exhaust system)
am2zzw00011928
|
3. Check that there is no contact with an exhaust manifold and exhaust manifold insulator.