 |
am2zzw00009994
CLUTCH PIPE AND HOSE REMOVAL/INSTALLATION [F66M-R]
id0510q2157000
1. Disconnect the negative battery cable. (See NEGATIVE BATTERY CABLE DISCONNECTION/CONNECTION.)
2. Remove the air cleaner, air hose and fresh air duct as a single unit. (See INTAKE-AIR SYSTEM REMOVAL/INSTALLATION [SKYACTIV-G 1.3, SKYACTIV-G 1.5].) (See INTAKE-AIR SYSTEM REMOVAL/INSTALLATION [SKYACTIV-D 1.5])
3. Remove the battery tray and PCM component. (with SKYACTIV-G 1.5) (See BATTERY REMOVAL/INSTALLATION [SKYACTIV-G 1.3, SKYACTIV-G 1.5].)
4. Remove the battery and battery tray. (with SKYACTIV-D 1.5) (See BATTERY REMOVAL/INSTALLATION [SKYACTIV-D 1.5].)
5. Remove the DC-DC converter (i-ELOOP) with the cables still connected and set it out of the way. (SKYACTIV-D 1.5) (with i-ELOOP) (See DC-DC CONVERTER (i-ELOOP) REMOVAL/INSTALLATION [WITH i-ELOOP (SKYACTIV-D 1.5)].)
6. Remove the windshield wiper arm and blade. (R.H.D.) (See WINDSHIELD WIPER ARM AND BLADE REMOVAL/INSTALLATION.)
7. Remove the cowl grille. (R.H.D.) (See COWL GRILLE REMOVAL/INSTALLATION.)
8. Remove the windshield wiper motor and link. (R.H.D.) (See WINDSHIELD WIPER MOTOR AND LINK REMOVAL/INSTALLATION.)
9. Remove the keyless beeper (with advanced keyless entry system). (R.H.D.) (See KEYLESS BEEPER REMOVAL/INSTALLATION.)
10. Remove the cowl panel. (R.H.D.) (See COWL PANEL REMOVAL/INSTALLATION.)
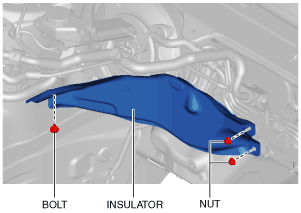
11. Remove the insulator. (R.H.D.)
am2zzw00009994
|
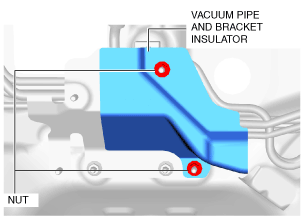
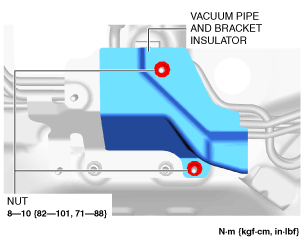
12. Remove the vacuum pipe and bracket insulator. (R.H.D.)
SKYACTIV-G 1.5
am2zzw00009995
|
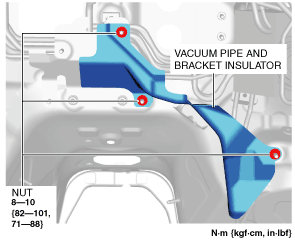
SKYACTIV-D 1.5
am2zzw00009996
|
13. Disconnect the vacuum pipe and bracket. (R.H.D.)
am2zzw00009997
|
14. Remove the clutch reserve hose while pressing the point indicated by the arrow in the figure.
am2zzw00009998
|
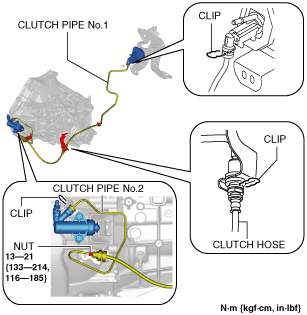
15. Remove the clutch pipes (No.1, No.2) and hose using the following procedure:
L.H.D.
am2zzw00009999
|
R.H.D.
am2zzw00010000
|
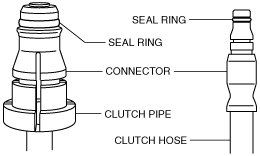
16. Verify that the seal rings are installed to the clutch pipes (No.1, No.2) and hose connector areas.
am2zzw00010001
|
17. Install clutch pipes (No.1, No.2) and the hoses.
18. Insert the clutch reserve hose connector straight.
19. Pull on the clutch receiver hose, clutch pipes (No.1, No.2) and hose connector area to verify that none are pulled out, and re-insert.
20. Install the vacuum pipe and bracket. (R.H.D.)
am2zzw00010002
|
21. Install the vacuum pipe and bracket insulator. (R.H.D.)
SKYACTIV-G 1.5
am2zzw00010003
|
SKYACTIV-D 1.5
am2zzw00010004
|
22. Install the insulator. (R.H.D.)
am2zzw00010005
|
23. Install the cowl panel. (R.H.D.) (See COWL PANEL REMOVAL/INSTALLATION.)
24. Install the keyless beeper (with advanced keyless entry system). (R.H.D.) (See KEYLESS BEEPER REMOVAL/INSTALLATION.)
25. Install the windshield wiper motor and link. (R.H.D.) (See WINDSHIELD WIPER MOTOR AND LINK REMOVAL/INSTALLATION.)
26. Install the cowl grille. (R.H.D.) (See COWL GRILLE REMOVAL/INSTALLATION.)
27. Install the windshield wiper arms and blades. (R.H.D.) (See WINDSHIELD WIPER ARM AND BLADE REMOVAL/INSTALLATION.)
28. Install the DC-DC converter. (SKYACTIV-D 1.5) (with i-ELOOP) (See DC-DC CONVERTER (i-ELOOP) REMOVAL/INSTALLATION [WITH i-ELOOP (SKYACTIV-D 1.5)].)
29. Install the battery and battery tray. (with SKYACTIV-D 1.5) (See BATTERY REMOVAL/INSTALLATION [SKYACTIV-D 1.5].)
30. Install the battery tray and PCM component. (with SKYACTIV-G 1.5) (See BATTERY REMOVAL/INSTALLATION [SKYACTIV-G 1.3, SKYACTIV-G 1.5].)
31. Install the air cleaner, air hose and fresh air duct as a single unit. (See INTAKE-AIR SYSTEM REMOVAL/INSTALLATION [SKYACTIV-G 1.3, SKYACTIV-G 1.5].) (See INTAKE-AIR SYSTEM REMOVAL/INSTALLATION [SKYACTIV-D 1.5])
32. Connect the negative battery cable. (See NEGATIVE BATTERY CABLE DISCONNECTION/CONNECTION.)
33. Bleed the air from the clutch system. (See CLUTCH FLUID REPLACEMENT/AIR BLEEDING [F66M-R].)