 |
am2zzw00011671
ANTENNA FEEDER NO.2 INSPECTION
id092000812500
5HB
1. Disconnect the negative battery cable. (See NEGATIVE BATTERY CABLE DISCONNECTION/CONNECTION.)
2. Remove the following parts:
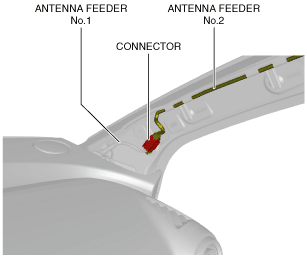
3. Peel back the trunk side trim and remove the C-pillar trim. (See C-PILLAR TRIM REMOVAL/INSTALLATION.)
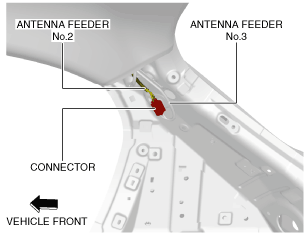
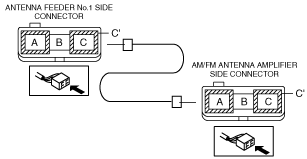
4. Disconnect the connector.
am2zzw00011671
|
5. Disconnect the connector.
am2zzw00011672
|
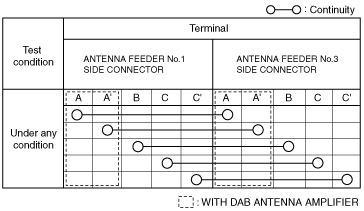
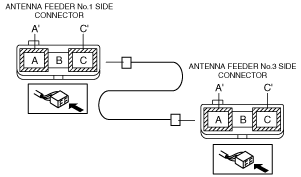
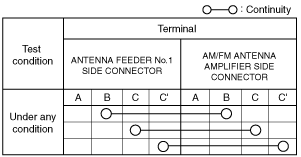
6. Verify that the continuity between antenna feeder No.2 terminals is as indicated in the table.
am2zzw00011673
|
am2zzw00011674
|
4SD
1. Disconnect the negative battery cable. (See NEGATIVE BATTERY CABLE DISCONNECTION/CONNECTION.)
2. Remove the A-pillar trim (RH). (See A-PILLAR TRIM REMOVAL/INSTALLATION.)
3. Remove the C-pillar trim (RH). (See C-PILLAR TRIM REMOVAL/INSTALLATION.)
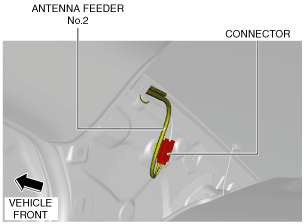
4. Disconnect the connector.
am2zzw00011675
|
5. Disconnect the connector.
am2zzw00011676
|
6. Verify that the continuity between antenna feeder No.2 terminals is as indicated in the table.
aaxjjw00013801
|
am2zzw00011677
|