REAR CONSOLE REMOVAL/INSTALLATION
id091700602000
1. Disconnect the negative battery cable. (See NEGATIVE BATTERY CABLE DISCONNECTION/CONNECTION.)
2. Remove the following parts:
- (1) Center console tray (See CENTER CONSOLE TRAY REMOVAL/INSTALLATION.)
- (2) Shift bezel (See SHIFT BEZEL REMOVAL/INSTALLATION.)
- (3) Upper panel (See UPPER PANEL REMOVAL/INSTALLATION.)
- (4) Selector lever knob (ATX) (See AUTOMATIC TRANSAXLE SHIFT MECHANISM REMOVAL/INSTALLATION.)
- (5) Shift lever knob (MTX) (See MANUAL TRANSAXLE SHIFT MECHANISM REMOVAL/INSTALLATION [F65M-R].) (See MANUAL TRANSAXLE SHIFT MECHANISM REMOVAL/INSTALLATION [F66M-R].)
- (6) Shift panel (See SHIFT PANEL REMOVAL/INSTALLATION.)
- (7) Console side panel (See CONSOLE SIDE PANEL REMOVAL/INSTALLATION.)
- (8) Front console box (See FRONT CONSOLE BOX REMOVAL/INSTALLATION.)
- (9) CD player (with CD player) (See CD PLAYER REMOVAL.) (See CD PLAYER INSTALLATION.)
- (10) DVD/CD player (with DVD/CD player) (See DVD/CD PLAYER REMOVAL.) (See DVD/CD PLAYER INSTALLATION.)
- (11) Front console (See FRONT CONSOLE REMOVAL/INSTALLATION.)
- (12) Side wall (See SIDE WALL REMOVAL/INSTALLATION.)
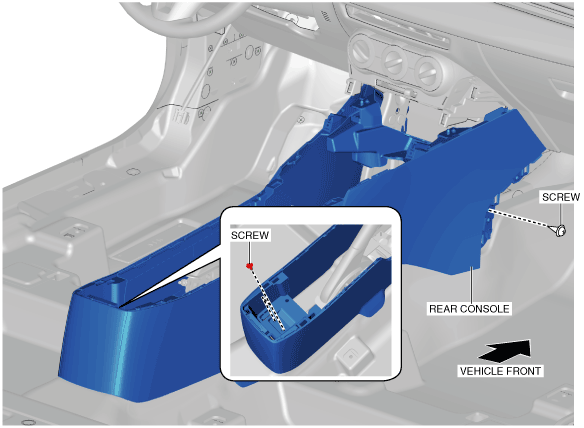
3. Remove the screws.
4. Remove the wiring harness clips.
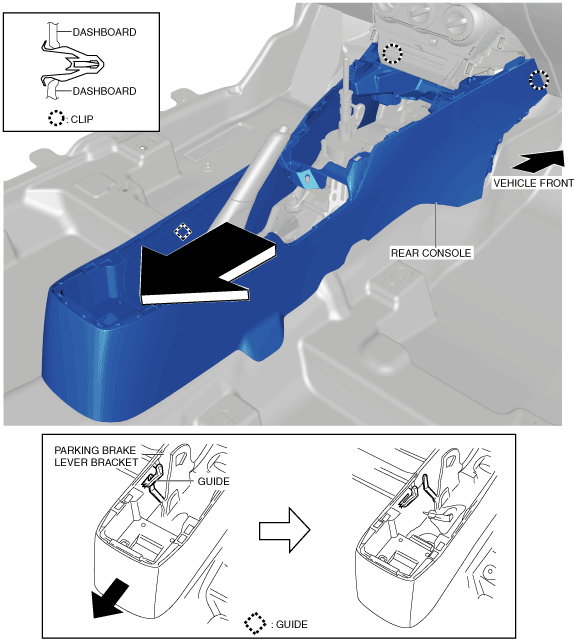
5. Move the rear console in the direction of the arrow shown in the figure, and while detaching the clips from the dashboard, release the guide from the parking brake lever bracket.
6. Remove the rear console while avoiding the shift lever (MTX)/Selector lever (ATX) and the parking brake lever.
7. Install in the reverse order of removal.