HEADLINER REMOVAL/INSTALLATION
id091700605700
5HB
1. Disconnect the negative battery cable. (See NEGATIVE BATTERY CABLE DISCONNECTION/CONNECTION.)
2. Remove the following parts:
- (1) A-pillar trim (See A-PILLAR TRIM REMOVAL/INSTALLATION.)
- (2) Sunvisor (See SUNVISOR REMOVAL/INSTALLATION.)
- (3) Front map light (dual light type) (See FRONT MAP LIGHT REMOVAL/INSTALLATION.)
- (4) Assist handle (See ASSIST HANDLE REMOVAL/INSTALLATION.)
- (5) Coat hook (See Coat Hook Removal/Installation Note.)
- (6) Front scuff plate (See FRONT SCUFF PLATE REMOVAL/INSTALLATION.)
- (7) Rear scuff plate (See REAR SCUFF PLATE REMOVAL/INSTALLATION.)
- (8) B-pillar lower trim (See B-PILLAR LOWER TRIM REMOVAL/INSTALLATION.)
- (9) Adjust anchor cover (See FRONT SEAT BELT REMOVAL/INSTALLATION.)
- (10) Upper anchor installation bolt on the seat belt (See FRONT SEAT BELT REMOVAL/INSTALLATION.)
- (11) B-pillar upper trim (See B-PILLAR UPPER TRIM REMOVAL/INSTALLATION.)
- (12) Rear seat cushion (See REAR SEAT CUSHION REMOVAL/INSTALLATION.)
- (13) Lower anchor installation bolt on the rear center seat belt (See REAR CENTER SEAT BELT REMOVAL/INSTALLATION.)
- (14) Rear seat back (See REAR SEAT BACK REMOVAL/INSTALLATION.)
- (15) Rear package tray (See REAR PACKAGE TRAY REMOVAL/INSTALLATION.)
- (16) Trunk covering (See TRUNK COVERING REMOVAL/INSTALLATION.)
- (17) Trunk board (See TRUNK BOARD REMOVAL/INSTALLATION.)
- (18) Trunk end trim (See TRUNK END TRIM REMOVAL/INSTALLATION.)
- (19) Trunk side trim (See TRUNK SIDE TRIM REMOVAL/INSTALLATION.)
- (20) C-pillar trim (See C-PILLAR TRIM REMOVAL/INSTALLATION.)
3. Disconnect the roof wiring harness connector and remove the roof wiring harness connector clip from the body.
4. Disconnect the rear washer hose C. (See REAR WASHER HOSE REMOVAL/INSTALLATION.)
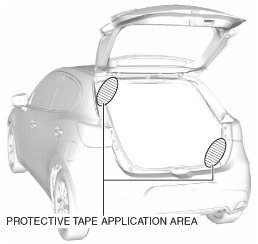
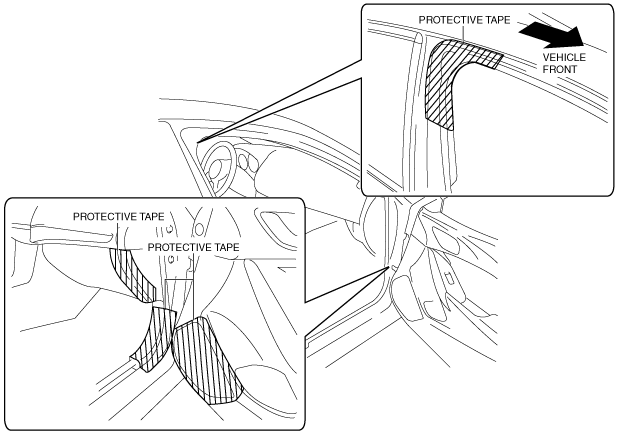
5. Affix protective tape to the position shown in the figure.
6. Fully recline the front seats.
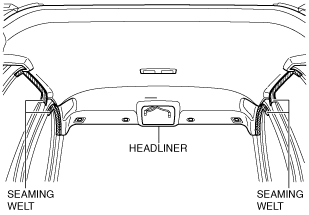
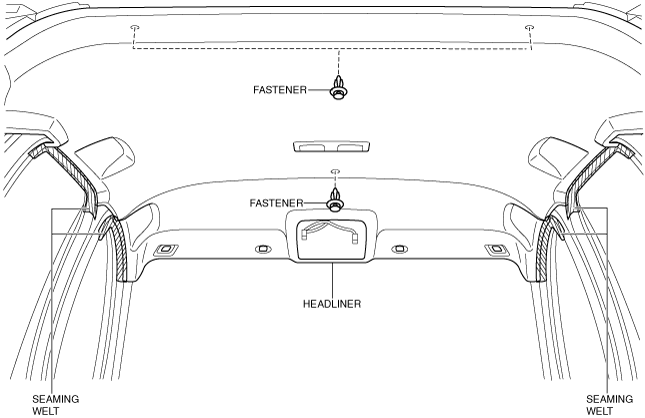
7. Temporarily install the seaming welt shown in the figure to the headliner.
-
Caution
-
• If fasteners are removed without temporarily installing the seaming welt, the headliner may fall off and the part may be damaged. Before removing fasteners, temporarily install the seaming welt to prevent the headliner from falling off.
8. Remove the fasteners.
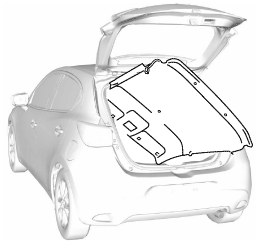
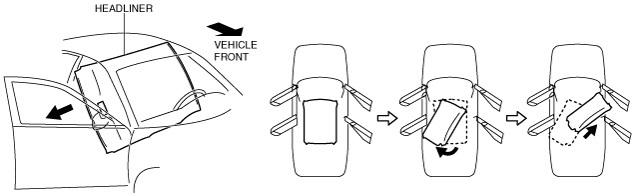
9. Partially peel back the seaming welt. Take the headliner out from the liftgate.
10. Install in the reverse order of removal.
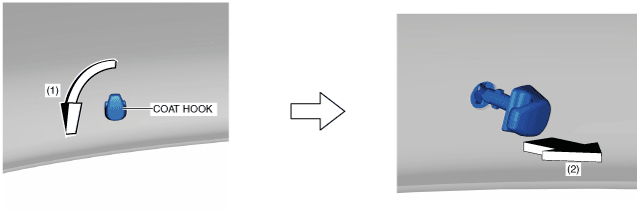
Coat Hook Removal/Installation Note
1. Rotate the coat hook in the direction of arrow (1) shown in the figure and remove it in the direction of arrow (2).
2. Install in the reverse order of removal.
4SD
1. Disconnect the negative battery cable. (See NEGATIVE BATTERY CABLE DISCONNECTION/CONNECTION.)
2. Remove the following parts:
- (1) A-pillar trim (See A-PILLAR TRIM REMOVAL/INSTALLATION.)
- (2) Sunvisor (See SUNVISOR REMOVAL/INSTALLATION.)
- (3) Front map light (dual light type) (See FRONT MAP LIGHT REMOVAL/INSTALLATION.)
- (4) Assist handle (See ASSIST HANDLE REMOVAL/INSTALLATION.)
- (5) Coat hook (See Coat Hook Removal/Installation Note.)
- (6) Center console tray (See CENTER CONSOLE TRAY REMOVAL/INSTALLATION.)
- (7) Shift bezel (See SHIFT BEZEL REMOVAL/INSTALLATION.)
- (8) Upper panel (See UPPER PANEL REMOVAL/INSTALLATION.)
- (9) Selector lever knob (ATX) (See AUTOMATIC TRANSAXLE SHIFT MECHANISM REMOVAL/INSTALLATION.)
- (10) Shift lever knob (MTX) (See MANUAL TRANSAXLE SHIFT MECHANISM REMOVAL/INSTALLATION [F65M-R].) (See MANUAL TRANSAXLE SHIFT MECHANISM REMOVAL/INSTALLATION [F66M-R].)
- (11) Shift panel (See SHIFT PANEL REMOVAL/INSTALLATION.)
- (12) Console side panel (See CONSOLE SIDE PANEL REMOVAL/INSTALLATION.)
- (13) Front console box (See FRONT CONSOLE BOX REMOVAL/INSTALLATION.)
- (14) CD player (with CD player) (See CD PLAYER REMOVAL.) (See CD PLAYER INSTALLATION.)
- (15) DVD/CD player (with DVD/CD player) (See DVD/CD PLAYER REMOVAL.) (See DVD/CD PLAYER INSTALLATION.)
- (16) Front console (See FRONT CONSOLE REMOVAL/INSTALLATION.)
- (17) Side wall (See SIDE WALL REMOVAL/INSTALLATION.)
- (18) Rear console (See REAR CONSOLE REMOVAL/INSTALLATION.)
- (19) Front scuff plate (See FRONT SCUFF PLATE REMOVAL/INSTALLATION.)
- (20) Rear scuff plate (See REAR SCUFF PLATE REMOVAL/INSTALLATION.)
- (21) B-pillar lower trim (See B-PILLAR LOWER TRIM REMOVAL/INSTALLATION.)
- (22) Adjust anchor cover (See FRONT SEAT BELT REMOVAL/INSTALLATION.)
- (23) Upper anchor installation bolt on the seat belt (See FRONT SEAT BELT REMOVAL/INSTALLATION.)
- (24) B-pillar upper trim (See B-PILLAR UPPER TRIM REMOVAL/INSTALLATION.)
- (25) C-pillar trim (See C-PILLAR TRIM REMOVAL/INSTALLATION.)
3. Disconnect the roof wiring harness connector and remove the roof wiring harness connector clip from the body.
4. Affix protective tape to the position shown in the figure.
5. Temporarily install the seaming welt shown in the figure to the headliner.
-
Caution
-
• If fasteners are removed without temporarily installing the seaming welt, the headliner may fall off and the part may be damaged. Before removing fasteners, temporarily install the seaming welt to prevent the headliner from falling off.
6. Slide the front seats to the rear end and fully recline them.
7. Open all of the doors (front/rear).
8. Remove the fasteners.
9. Partially peel back the seaming welt. Take the headliner out from the opened passenger-side door opening.
10. Install in the reverse order of removal.
Coat Hook Removal/Installation Note
1. Rotate the coat hook in the direction of arrow (1) shown in the figure and remove it in the direction of arrow (2).
2. Install in the reverse order of removal.